Linux File Permissions Guide; Managing Linux file permissions and access control is one of the foundational pillars of Linux system administration and cybersecurity. Whether you are configuring a web server, auditing a system for privilege escalation vectors, or simply managing multi-user access, understanding how Linux handles read, write, and execute rights is critical to keeping your systems secure.
In this guide, we will break down the structure of Linux permissions, explore the fundamental commands (chmod, chown, and chgrp), cover special permissions like SUID and SGID, and share real-world security best practices.
Linux file permissions employ a triadic access framework (Owner, Group, and Others) alongside three categories of permissions (Read, Write, and Execute) to safeguard the file system. This security architecture underpins multi-user Linux operating systems, thwarting illegal access, safeguarding system utilities, and protecting important configuration files from nefarious exploitation.
Also Read:
Following this complete Linux File Permissions Guide will help you understand how operating systems restrict unauthorized access to system files, administrative utilities, and confidential data. Whether you are managing local web hosting servers or performing security audits, this Linux File Permissions Guide covers the essential knowledge every system administrator needs.
1. Understanding Linux File Permission Structure
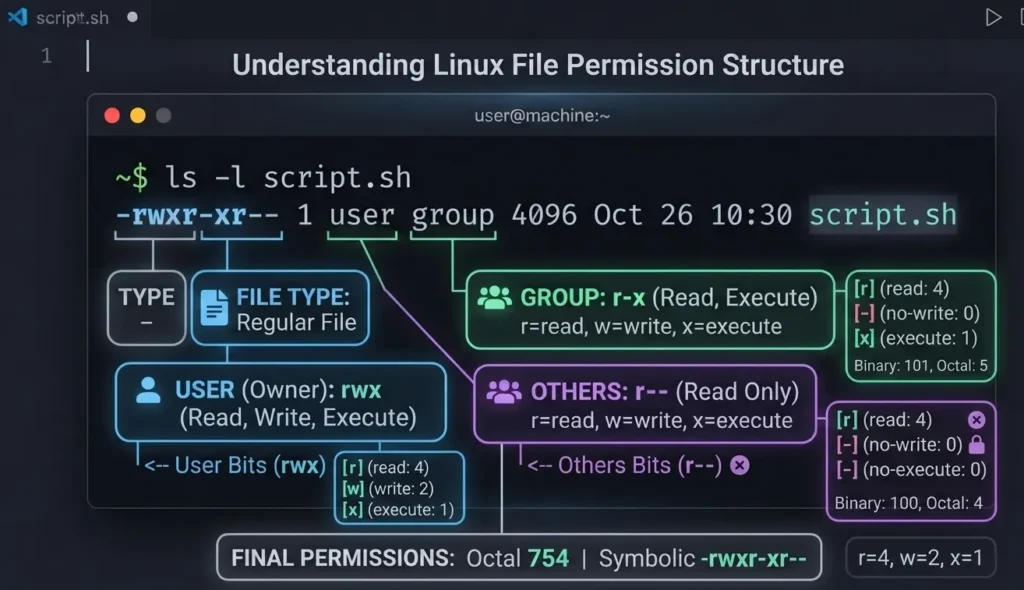
Linux file permissions employ a 10-character sequence to determine file accessibility, organized into one file-type indicator and three separate user-category segments. Administered thru directives such as chmod and chown, this security architecture delineates permissions based on file proprietors, designated groups, and all other system users.
In Linux, every file and directory is owned by a User (Owner) and assigned to a Group. Access rights are divided into three distinct target audiences:
- User (
u): The individual user who owns the file. - Group (
g): Members of the system group that owns the file. - Others (
o): All other system users not in the owner or group categories.
Viewing Permissions with ls -l
To view the permissions of files in your current directory, run:
Bash
ls -l
You will see an output similar to this:
Plaintext
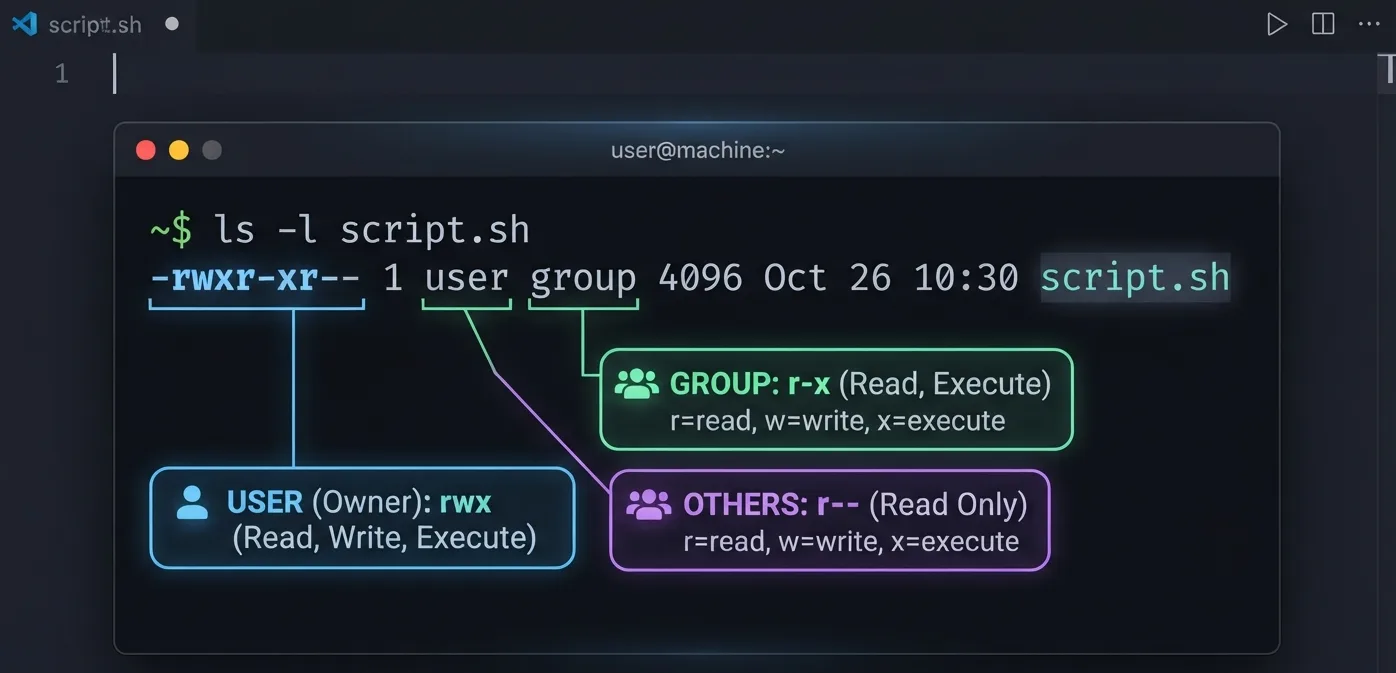
-rwxr-xr-- 1 cyberinfolab security 4096 Aug 07 17:31 deploy.sh
drwxr-xr-x 2 cyberinfolab security 4096 Aug 07 17:31 logs
Decoding the Permission String
The 10-character string at the beginning (-rwxr-xr--) breaks down into four main parts:
| Position | Symbol | Meaning | Example Above |
| 1 | File Type | - = Regular file, d = Directory, l = Symbolic link | - (File) |
| 2–4 | User Rights | Read (r), Write (w), Execute (x) | rwx (Full access) |
| 5–7 | Group Rights | Read (r), Write (w), Execute (x) | r-x (Read & Execute) |
| 8–10 | Others Rights | Read (r), Write (w), Execute (x) | r-- (Read only) |
2. Symbolic vs. Numeric (Octal) Modes
Symbolic and octal modes represent the two methods for administering file and directory permissions using the chmod command in Linux and Unix environments.
When modifying Linux file permissions with chmod, you can use Symbolic Mode or Numeric (Octal) Mode.
Symbolic Mode Syntax
Symbolic notation uses characters to represent target users (u, g, o, a) and operators (+, -, =):
u+x: Add execute permission for the User.g-w: Remove write permission for the Group.o=r: Set Others permission strictly to Read.
Bash
chmod u+x script.sh
chmod g-w confidential.doc
Numeric (Octal) Mode Syntax
In octal mode, permissions are represented by a 3-digit number. Each permission type is assigned a numerical value:
- Read (
r) = 4 - Write (
w) = 2 - Execute (
x) = 1 - No Access (
-) = 0
To calculate a permission set, sum the values for each category:
7=4 + 2 + 1(Read, Write, Execute)6=4 + 2 + 0(Read, Write)5=4 + 0 + 1(Read, Execute)4=4 + 0 + 0(Read-only)
Common Examples:
Bash
# User: rwx (7), Group: r-x (5), Others: r-x (5)
chmod 755 application.sh

# User: rw- (6), Group: r-- (4), Others: --- (0)
chmod 640 config.php
3. Managing Ownership: chown and chgrp
Chown and chgrp are the two principal Linux commands utilized for administering file and directory ownership. Chown (change owner) is capable of altering both the user and group ownership, whereas chgrp (change group) is exclusively focused on changing group ownership.
Overseeing ownership is essential as Linux permissions—Read, Write, and Execute—are fully contingent upon the file’s owner.
Core Syntax Comparison
| Command | Modifies User | Modifies Group | Basic Syntax Example |
|---|---|---|---|
chown | Yes | Yes | sudo chown alice project.txt |
chgrp | No | Yes | chgrp devteam project.txt |
The chown Command
chown allows you to change the user and/or group owner of a file or directory.
Bash
# Change user owner to 'sysadmin'
sudo chown sysadmin data.txt

# Change user owner to 'sysadmin' and group owner to 'webdevs'
sudo chown sysadmin:webdevs /var/www/html/index.php

# Recursively change ownership for an entire directory
sudo chown -R www-data:www-data /var/www/html/
The chgrp Command
To change only the group ownership without modifying the user owner:
Bash
sudo chgrp security-team audit.log
4. Special Permissions: SUID, SGID, and Sticky Bit
Standard rwx permissions do not cover all advanced operational requirements. Linux introduces three special permissions for specialized use cases:
1. SUID (Set User ID)
- What it does: Allows an executable file to run with the permissions of the file owner instead of the user who runs it.
- Common use: The passwd command uses SUID so regular users can temporarily access root privileges to update their password.
- How to set:
- Symbolic: chmod u+s filename
- Numeric: chmod 4755 filename (digit 4 adds SUID)
- Indicator: Appears as an s in the owner’s execute spot (rwsr-xr-x).
2. SGID (Set Group ID)
- What it does: On files, it runs the program with the file’s group owner privileges. On directories, new files and subdirectories automatically inherit the parent directory’s group instead of the creator’s default group.
- Common use: Shared team folders where multiple users need to read and write files without group ownership mismatches.
- How to set:
- Symbolic: chmod g+s directoryname
- Numeric: chmod 2775 directoryname (digit 2 adds SGID).
- Indicator: Appears as an s in the group’s execute spot (rwxr-sr-x).
3. Sticky Bit
- What it does: Applied only to directories, it ensures that only the file owner, directory owner, or root can delete or rename files inside that directory.
- Common use: The /tmp directory, where any user can create a file, but nobody can delete another user’s files.
- How to set:
- Symbolic: chmod +t directoryname
- Numeric: chmod 1777 directoryname (digit 1 adds the sticky bit).
- Indicator: Appears as a “t” at the end of the permissions (drwxrwxrwt).
5. Security Best Practices for System Hardening
System hardening involves diminishing a system’s susceptibility by removing superfluous services, implementing stringent access restrictions, and fortifying settings.
- Follow the Least Privilege Principle: Never grant
777permissions (chmod 777) to fix an access issue. Identify the exact user or group that requires access and grant only necessary rights. - Audit SUID Executables: Periodically scan systems for unauthorized SUID files:Bash
find / -perm -4000 -type f 2>/dev/null - Secure SSH Keys and Sensitive Configs: Ensure SSH private keys have restrictive permissions:Bash
chmod 700 ~/.ssh chmod 600 ~/.ssh/id_rsa - Restrict Web Root Permissions: Web server user accounts (like
www-dataornginx) should not own files that they don’t explicitly need to write to.
Core Best Practices
- Patch Management: Apply operating system and application updates regularly using automated tools to fix known vulnerabilities.
- Least Privilege Access: Restrict user permissions and service accounts to only what is required to perform their specific tasks.
- Attack Surface Reduction: Disable unused ports, legacy protocols (like Telnet or FTP), and extraneous background services or drivers.
- Strong Authentication: Enforce multi-factor authentication (MFA) for privileged or remote access and require complex passwords.
- Network Segmentation: Isolate critical servers, workstations, and operational technology to limit lateral movement during a breach.
- Data Encryption: Protect sensitive data both at rest (full-disk encryption) and in transit (TLS/HTTPS).
- Continuous Logging and Monitoring: Enable audit trails, centralized log management, and intrusion detection systems to catch suspicious actions early.
You can review standard configuration benchmarks via the Center for Internet Security for detailed platform-specific rules.
🧠 Frequently Asked Questions (FAQs)
chmod 777 grants full Read, Write, and Execute permissions to the User, Group, and Others. This allows any user or compromised service on the system to modify, overwrite, or execute code within the file, posing a major security risk.r allows reading content, w allows modifying content, and x allows running it. On a directory, r permits listing its contents (ls), w allows adding/deleting files inside it, and x allows entering or traversing it (cd).umask defines default permissions subtracted from new files (666) and directories (777). A standard umask of 022 results in default file permissions of 644 (rw-r--r--) and directory permissions of 755 (rwxr-xr-x).find command targeted at directories:find /path/to/target -type d -exec chmod 755 {} +find command targeted at regular files:find /path/to/target -type f -exec chmod 644 {} +chown (Change Owner) can modify both the individual user owner and group owner of a file, whereas chgrp (Change Group) is exclusively used to modify group ownership.SGID (2000): Runs files with group owner privileges or forces directory inheritance.
Sticky Bit (1000): Prevents users from deleting files owned by others in shared directories like
/tmp.find / -perm -4000 -type f 2>/dev/null📌 Conclusion
Mastering Linux file permissions and access control is vital for securing systems against unauthorized access, privilege escalation, and configuration errors. By combining standard access modes (chmod and chown) with special permissions (SUID, SGID, and Sticky Bit), system administrators can establish robust security controls across multi-user server environments.
- Least Privilege Enforcement: Always grant the absolute minimum rights needed; avoid
chmod 777. - Regular Security Audits: Scan for dangerous SUID binaries and insecure file ownership using automated scripts.
- Hardening Standards: Secure critical folders, SSH keys, and system binaries using benchmark frameworks like the Center for Internet Security.
1 thought on “Linux File Permissions Guide: Master Access Control in 2026 (Complete Guide)”